Crafting the Awesome WordPress Site from Scratch
Table of contents
Intro
My girlfriend is a Kyiv tour guide. She had a pretty old WordPress site and wanted to update it to a better design for a while. By happy coincidence, her brother mastered UX/UX design. Long story short, he created an excellent prototype in Figma. It was time to convert it to HTML and CSS, create a custom WordPress theme, and migrate her site.
In Ukraine, there's a common belief that programmers can handle any tech-related task, from fixing a TV to welding a bicycle. There is an ironic saying that translates to English as "Aren't you a programmer?".
My girlfriend asked me to do it even though I knew little about WordPress, PHP, and Figma, but I rolled my sleeves and thought, "Challenge accepted."
Creating static pages from the design
Figma design to HTML and CSS
First, I needed to convert the design to HTML and CSS files.
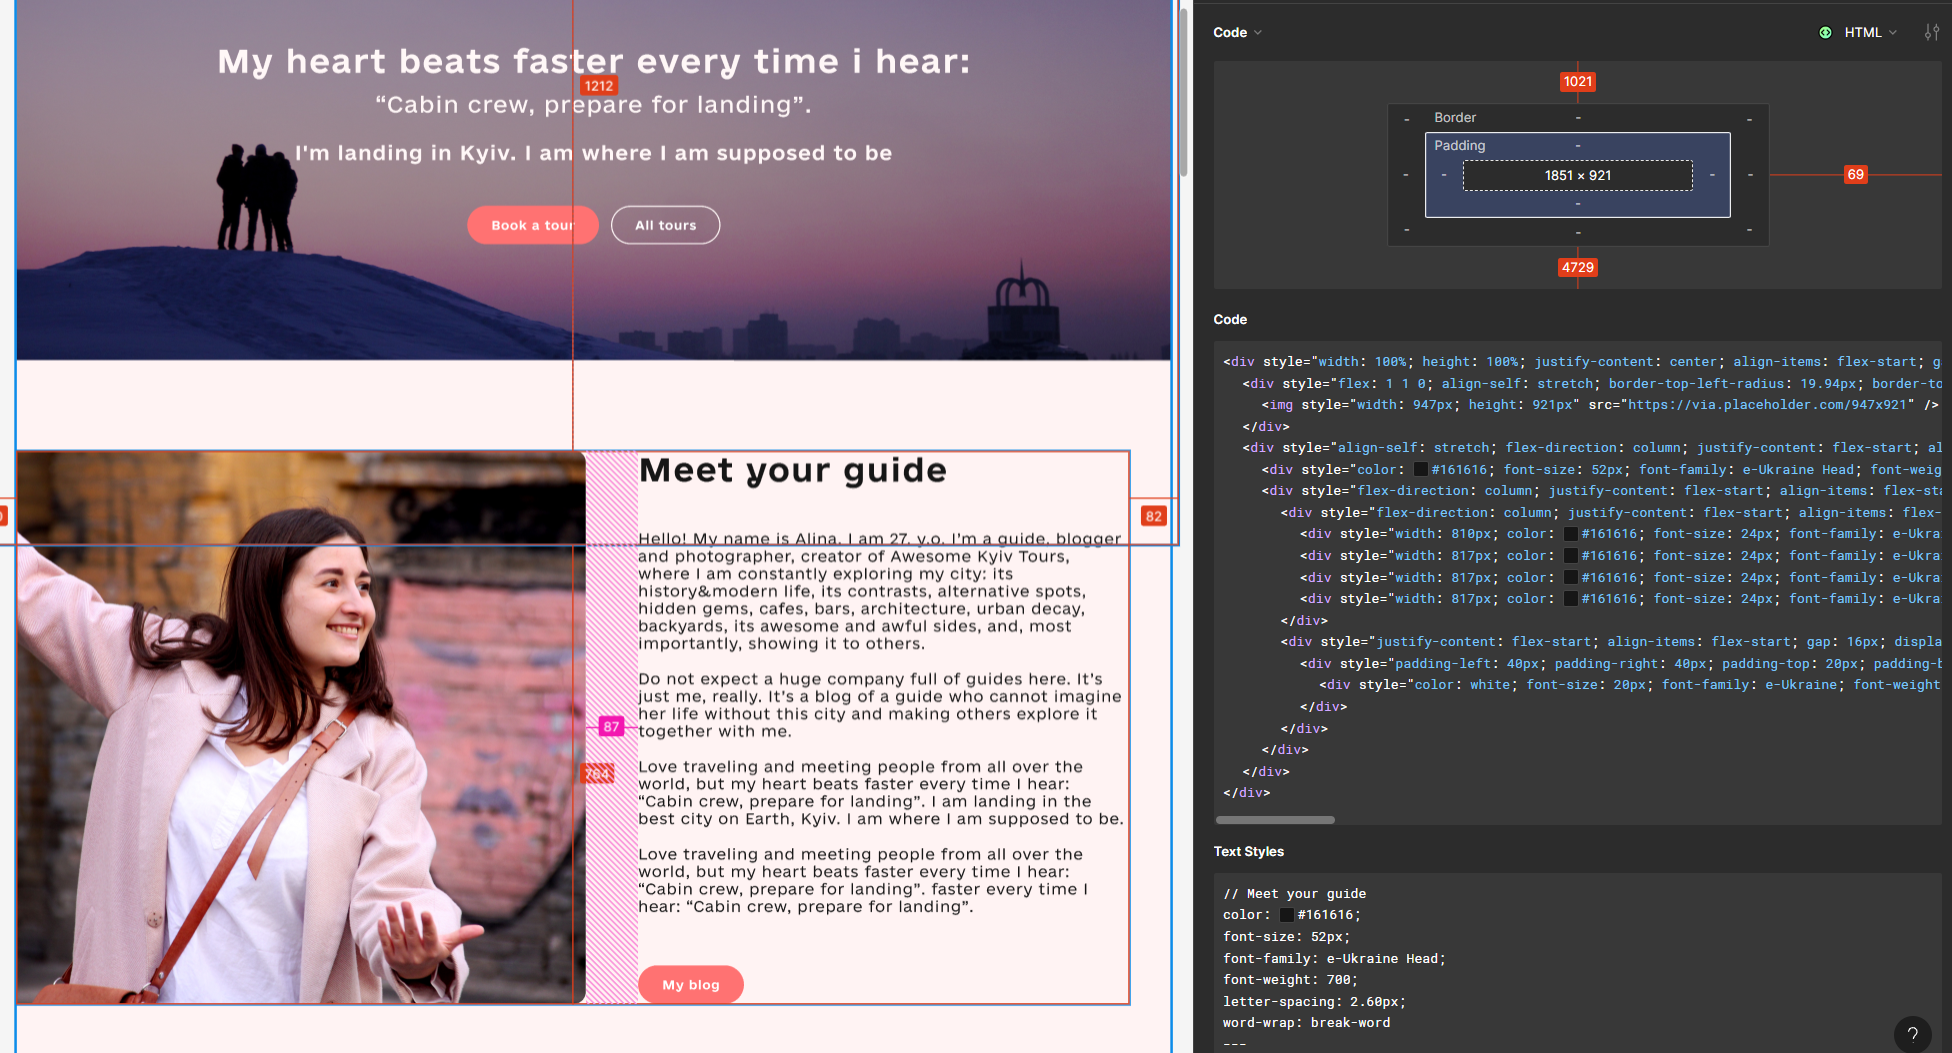
The design was ready in Figma, and I liked that it allowed me to copy CSS styles and even generate some HTML with styles for design elements.
I liked that Figma supports a dev mode where you can generate HTML and CSS for your elements. For example, you can select elements in Figma:

In the dev section, you can choose Figma to Code -> HTML. It will give you HTML markup with styles:
There is even an option to generate Tailwind and React code with it.
But I had two main issues with it:
-
It does not generate HTML and CSS separately. All styles are embedded in HTML
-
It often generates styles using absolute positioning, which is not the best approach for all cases and is not optimal for responsive design.
To address these issues, I turned to ChatGPT. I asked it to split the code into separate HTML and CSS files and use Flexbox instead of absolute positioning. It worked pretty well for me, though I had to tweak the result, but it eliminated a lot of manual labor.
Basic styling approach
Initially, I wanted to use Tailwind but decided not to because I wanted to avoid introducing any build steps.
I started by creating a file called variables.css with all colors from my design:
:root {
    --main-bg-color: #fffafa;
    --main-bg-color-2: #fff3f3;
    --text-black: #161616;
    --text-white: #fff7f7;
    --text-red: #ff7272;
    --text-grey: #7c7c7c;
    --text-grey-light: #2a2a2a;
    --button-red: #ff7272;
    --button-white: #fff7f7;
    --button-lite-grey: #d9d9d9;
    --button-black: #161616;
    --button-grey: #5f5f5f;
    --button-red-200: #ff6464;
    --button-red-300: #ff5454;
  }
Additionally, I was creating a separate CSS file for every section or part of the pages. It helps to keep everything organized and easy to find.

Flex Box
For layout, I mostly used Flex Box and liked it a lot. You need to know only a few properties to get up and running:
-
display: flex for a parent element
-
justify-content for horizontal alignment of items
-
align-items for vertical alignment of items
-
flex-direction for column and row layout
It was enough to recreate a responsive design in HTML and CSS.
CSS Grid

I also used CSS Grid for a photo gallery. One interesting trick was using the nth-child selector to enforce every N'th element to take specified columns and rows. I had 7 styles for the first 7 elements, and then the pattern had to repeat for the next elements. Here is an excerpt that used this approach:
.gal-container:nth-child(7n+1) {
    grid-column: span 1;
    grid-row: span 2;
}

.gal-container:nth-child(7n+2) {
    grid-column: span 2;
    grid-row: span 1;
}

/* ...similar styles for the following 5 elements */
Here, 7 is the number of elements in my "pattern." So, the 8th element will have the same style as the first element.
Styles for the grid itself looked like this:
.grid-container {
    display:grid;
    grid-template-columns: 2fr 1fr 1fr 2fr;
    grid-auto-rows: 270px 374px 400px;
    grid-gap:10px;
    grid-auto-flow: dense;
}
Three ways to create a WordPress theme
After researching the topic of creating a custom WordPress theme for a while, I found out that there are three ways to create a WordPress theme:
-
Classic theme. It is the most common approach that requires writing PHP code.
-
Block theme. This approach is drastically different. First of all, it enables the so-called "Full site editing." The end user can edit any site part, such as the header, footer, or page. It does not require writing PHP. Instead, you create a bunch of HTML files and annotate EVERY html tag with WordPress special comments that specify what type of block it is. Afterward, a user can change every block in the block editor.
-
Headless WordPress. With this approach, you can decouple your front end and use WordPress only as a back end. You can use any tech stack for your front end and any hosting. For example, you can develop your website in Next.js and host it on Vercel. It also required a server with WordPress that would serve as a back-end.
I needed to decide what approach to take, so I checked out a few courses on Udemy.
Learning materials
I searched Udemy courses and found the best ones, in my opinion:
-
Become a WordPress Developer: Unlocking Power With Code. This course takes the most holistic approach and only requires a little prior knowledge about programming and WordPress. I enjoyed the author's remarkable ability to explain the material clearly, even though I prefer more high-paced courses. The course concentrates on classic themes but also covers block themes.
-
Complete WordPress Developer Course 2023 - Plugins & Themes. This course shows how to create WordPress block themes with full site editing.
-
Next JS & WordPress: Build rapid NextJS sites with Next & WP. High-paced course about headless WordPress and creating a NextJS front-end.
These three courses cover creating a WordPress site from three angles: classic themes, block themes, and headless WordPress with NextJS. I would watch all three if becoming a WordPress expert was my goal. In my case, I tried out each one and watched some parts to understand the different approaches.
Setting up the local environment
I started by searching Reddit for the best way to set up a WordPress environment on my machine.
The easiest one was using Local by Flywheel. It's a very nice software that gets you started in minutes and does not require any configuration.
If I ever need to create some desktop software, I'd consider Local an example of great UX.
Choosing the approach
First attempt
The approach of using headless WP with NextJS was the most appealing as I'd use the tech stack I like the most (such as NextJS 13 with app router and Tailwind CSS). I started with it, and it turned out to be pretty good, but this approach had the following drawbacks:
-
It required two hosting providers: the first for your WordPress and the second for your front end. So it is more expensive and requires more support in the future.
-
Finding a developer who knows WP and front-end tech stack is much more challenging. It doesn't matter if you plan to support the website yourself and forever, but it would be hard to outsource it to someone else.
-
You must implement block rendering by yourself, so for every block you want to support, such as a paragraph, image, or menu, you need to implement the rendering logic.
-
Some WordPress plugins might not work with it.
Come to think of it, I decided to reject this approach. Paying for two hosting providers is not justifiable in this case. Additionally, If there were any changes required, I wanted to be able to outsource it to someone without supporting this site myself.
Second attempt
Okay, so what approach should I choose instead? Block themes were a direction that WordPress shifting to, so I decided to give it a try.
I needed to extract parts of my site, such as the header, footer, etc., to separate files and apply special comments to HTML elements to make them editable and adjustable for the end user.
Actually, it is more complicated. It seems that WordPress developers usually do the following:
-
Recreate a component (meaning the part with HTML and CSS) in the block editor close to the original design.
-
Copy the result HTML (with special WP comments describing each block) to a dedicated file (e.g., header.html)
-
Create styles to make it look like the design
-
Assign CSS classes to blocks in the block editor
Basically, you have to recreate your HTML and CSS in a "WordPress" way, which doesn't make much sense to me when you already have working HTML and CSS.
Here is another case: header menu. WordPress already has the navigation block that is supposed to be used for site menus. I tried to customize it and make it look and behave like the one in my static template, but it was a pain in the neck. For example, I had a nested menu displaying a website page list. I used the core/page-list block and enabled editing background and border in theme.json (a file configuring all styling for your theme). It looked fine in the block editor but did not work when I opened the website. It turned out that this block did not support settings such as background and border, even though it was working fine in the block editor. And there were lots of cases like that.
This approach is time-consuming and justifiable only if you create a theme for selling or for a customer with some specific requirements.
Third attempt
Finally, I decided to create a classic theme. It was much more accessible. It boils down to splitting header and footer components into separate files, creating files such as front-page.php, index.php, single.php, etc., and writing PHP code with standard WP functions for iterating over posts, getting thumbnails, pagination, etc.
Despite WordPress promoting block themes with complete site editing, I preferred this approach for its simplicity.
Creating a custom WP theme
My main question was how to allow the user to add new content for custom pages (custom post types). Most WP developers use the ACF plugin for this. It enables you to build and bind a form to a custom post type or a specific page. Then, the user can add data for that page, and you can query that data with your PHP code. This approach is much simpler than using Gutenberg blocks.
I also had a couple of forms on the website, so I used the WP forms plugin. It was okay, even though it took a lot of work to customize the styles of the forms.
To insert a form into your template PHP file, you need to copy a short code from WP Forms UI and add it in the following way:
<?php echo do_shortcode('[wpforms id="360" title="false"]');?>
Regarding JS libraries, the only one I used was Swiper because there were multiple, well, sliders in the design (for reviews, tours, highlights).
Choosing a hosting
After reading WP hosting-related posts on Reddit, it came down to the following ones:
After reading some not flattering reviews about Bluehost, I decided that it was a no-go because of slow website speed and poor customer service.
I used SiteGround in the past, and it was good, especially their intuitive UI. However, their pricing is relatively high: 15.99$ without discount at the time of writing. It was not the best choice because it is priced only for one site with 10 GB storage.
I read good reviews about Cloudways hosting. Some users even stated that it is the best one at the moment. However, it is 14$ per month, which is a bit high for my use case. But Cloudways has one big advantage: you can host whatever number of sites you want and still pay only 14$ per month, so in this case, it is the best option.
Finally, A2 hosting. The cheapest plan (11.99$ and 2.99$ with a monthly discount) gives you 100 GB storage, good speed, and support. The UI could be clearer, but otherwise, it is excellent, so eventually I decided to go with it.
There is one more hosting I want to mention. One of the best and cheapest options is a WordPress droplet on DigitalOcean with 25 GB of storage. It is 5$ per month but requires some manual setup and using SSH. Actually, for my own web site I used DigitalOcean and honestly, it is easy and took me around 5 minutes to get up and running.
WordPress Deployment
The process of migrating the local copy of WordPress to your hosting is pretty straightforward.
There are two options: manual and with a plugin. I'll describe only the one with a plugin.
All-in-One WP Migration plugin
This plugin allows you to export all your data, such as database, media library, posts, and pages, as a single file, and then you can import that file from the WordPress instance on your hosting. All of these functions are free and relatively easy to use.
There is only one caveat: if the result file's size is significant, you might have issues with export or import. My file was about 2 GB, and I had to tune the configs) and settings in my WordPress deployment.
Conclusion
WordPress is 20 years old but still the most popular CMS. Like it or not, half of the internet runs on it, and no other CMS has any good features to make people switch. WordPress development might be frustrating because different approaches to building custom themes exist. But you can be pretty productive once you get the hang of it.